

How To Change Mobile Home Tub And Shower Faucet To Standard Faucet
Shower Faucet Installation
Updated: Dec. 14, 2021
3 common problems; 3 simple solutions
Wondering how to replace a shower valve when valve admission is bad or nonexistent, when the old pipes are galvanized steel, and when you want to go from a two-handle to ane handle valve with temperature-balancing and anti-scald features? Nosotros evidence you how to solve these common problems.
You might also like: TBD
- Fourth dimension
- Complexity
- Cost
- A full mean solar day
- Intermediate
- $51–100
Overview: three common shower valve replacement problems
If your bath or shower faucet drips, you can fix the erstwhile shower valve and faucet with a few cheap replacement parts. (If the spout and handles are worn, you lot can change them out, too.) Simply if it's a new way you lot're after or features similar preset temperatures or anti-scald protection, it'southward time for replacement. How to change shower fixtures and installing a new shower faucet is a straightforward process of connecting the new valve to the quondam pipes. Sometimes all you need are the manufacturer's instructions and some bones plumbing know-how. Merely it isn't that easy very oft. This commodity volition focus on iii complications that installation manuals and plumbing books ignore.
- In that location'south no access to the within of the wall.
- The former pipes are galvanized steel.
- You want to replace a 2-handle faucet with a single-handle model.
Problem one: No admission console
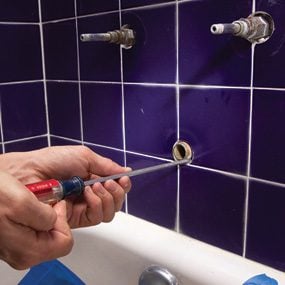
Photo 1: Mark the location
Punch a pigsty into the wall behind the faucet to marking the location of the access console. But sideslip a long screwdriver aslope the tub spout nipple and push button.
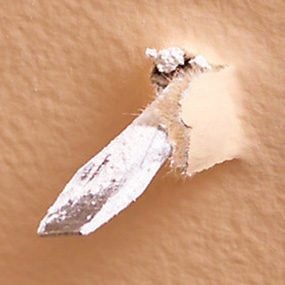
Photograph 1A: Location on back side wall
Poke a hole from the bath side. Don't endeavour to measure and guess.
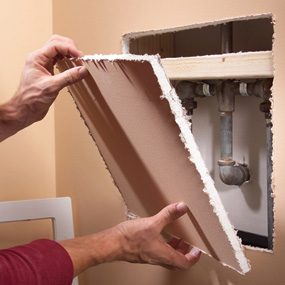
Photo two: Cutting an admission hole
Cut a pigsty 3 in. smaller than the access console and so you tin see the exact pipe locations. And then mark and cut the full-size access hole.
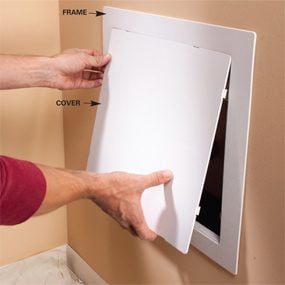
Photo 3: Mount the access panel
Glue the access panel's frame into identify and snap on the embrace later yous've installed the new faucet. Yous can pigment the panel to match the wall.
To supersede the faucet, yous accept to work inside the wall. Some homes accept a removable panel in the next room behind the faucet. If yous don't have an access panel, you might exist able to replace the faucet by cutting a hole in the shower environs (Problem 3 below), only the best solution is to install a paintable plastic panel behind the faucet. You'll find them in various sizes at plumbing suppliers, some home centers or online (search for "admission panel"). Purchase a console that'southward at least 14 x fourteen in. If you don't want to install a console because it would exist an eyesore, an oversized cover plate inside the shower surroundings is some other choice (Trouble iii below). If you already accept an admission console but it's too low to provide easy access to the faucet, you tin can install a second panel above the existing one.
Don't try to position the admission pigsty past taking measurements. Instead, remove the tub spout or faucet handles and punch a marker hole through the wall (Photo 1). If the wall is plaster rather than drywall, use a drill and a long flake instead of a screwdriver. Before you cut a hole sized for the access console, cut a smaller hole (Photograph 2). That style, you can encounter exactly where the pipes and valves are located and position the total-size hole for best access to them. Utilise the admission console frame equally a template to mark the total-size hole. To avoid damaging the frame of the panel, install it after yous've replaced the faucet
(Photo 3).
If your tub or shower faucet is dripping, see How to Repair a Dripping Tub Faucet.
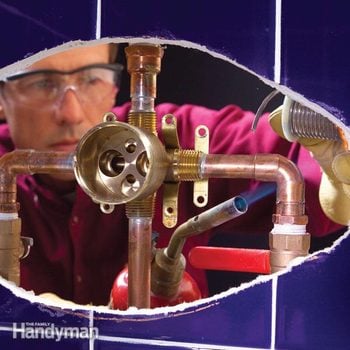
Problem ii: Galvanized steel pipe
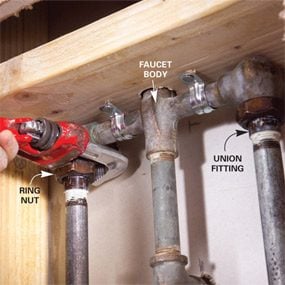
Photograph one: Disconnect the union fittings
Unscrew the ring basics that spike the union fitting to the faucet body. So unscrew the union fittings from the supply lines.
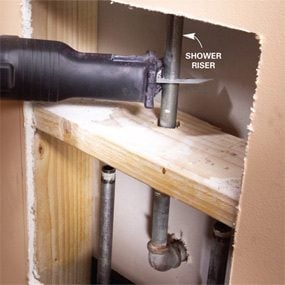
Photo 2: Cut the shower riser
Cut the shower riser with a reciprocating saw or jigsaw. Cut slowly and gently so you don't loosen the connections in a higher place.
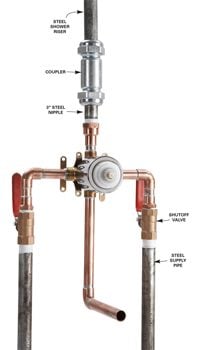
Photo 3: Add a galvanized pipe coupler
Connect the cutoff shower pipage using a coupler designed for galvanized pipe. The coupler won't work with copper pipe, so screw a curt galvanized steel nipple into a copper fitting.
Dissimilar copper or plastic, steel pipes are joined with threaded, screw-together connections. And then you lot can't simply cut the hot and cold supply pipes. That would remove the threaded ends and yous'd have no reliable way to connect new pipe.
To preserve those threaded ends, unscrew the union fittings that connect the supply lines to the faucet (Photo 1). You can leave the spout nipple connected to the faucet and remove it forth with the valve. If the faucet is connected to a showerhead, cut the "shower riser" pipe (Photograph 2). This pipe isn't under abiding pressure, so you can reconnect information technology with a special coupler later.
Connect the new faucet as shown in Photo 3. To connect the cutoff shower riser, employ a special compression coupler designed for galvanized steel pipe (called a "Dresser" coupling). For a meliorate seal and easier installation, utilize Teflon piping sealant to the coupler'southward threads and safe seals. Run the shower and check the coupler for leaks. If you find one, tighten the coupler'south nuts.
Effigy A: New Shower Valve Connections to Galvanized Pipe
Make the connections shown when going from quondam galvanized pipe to copper pipe and adding the new valve. Also add new shutoffs.
Problem 3: Replacing two handles with ane
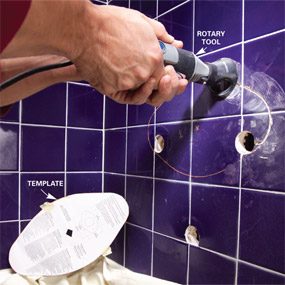
Photo 1: Cut the tile
Cut a pigsty for the new valve using a rotary tool equipped with a tile-cutting fleck. Marker the cutout using the cover'south paper template and a crayon.
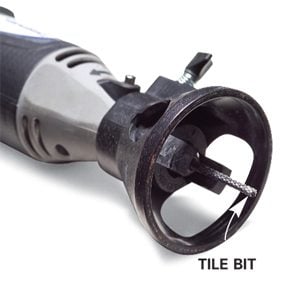
Photo 1A: Tile cutting flake
A tile bit in a rotary tool cuts through most ceramic tile.

Photograph 2: Install the new valve
Solder in the new valve. Employ the paper template to make certain the valve is centered in the cutout.
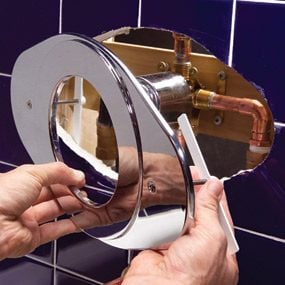
Photograph 3: Mount the cover plate
Mount the oversized comprehend plate. Install the faucet's standard encompass plate over information technology.
Shower Faucet Replacement
If you have a two-handle faucet, it's easiest to supplant information technology with another two-handle model. If you want the convenience of a single handle, you'll have to hide the two holes left by the handles. An oversized cover plate does just that. Plus, it covers an access pigsty, possibly assuasive you to skip adding an access panel. Keep in mind that replacing a faucet using this smaller hole can be difficult if not impossible—a large access panel makes the job much easier. You'll find oversized encompass plates (about $23) at plumbing supply stores or online (search for "renovation cover plate").
To install a single-handle faucet, yous'll accept to cut a pigsty into your shower surround. If your surround is fiberglass or acrylic, cut the pigsty using a jigsaw and a fine-tooth blade (a coarse bract causes more vibration, which can cleft the environs). Utilise strips of masking tape to the surround to avert scratching or chipping the surface. Run the saw at total speed, merely button it slowly and gently along the cut marker. If you feel the blade striking a pipe within the wall, terminate immediately and continue past the pipe using a hacksaw bract.
To cutting tile, utilize a rotary tool equipped with a tile-cutting bit (Photograph one). Set the cutting depth of the flake at one/iv in. and brand the first pass. Make more than passes, setting the bit one/4 in. deeper each time until you lot've cut completely through the surround. If yous don't own a rotary tool, you take a few other options: You can endeavour a jigsaw and ceramic tile blade (most $5). These blades cutting softer tile well. If y'all find that your tile is likewise hard, drill a serial of 1/iv-in. holes through the tile and wall using a carbide ceramic tile bit (about $v). Drill the holes close together so in that location'southward little or no space between them. Then cutting whatsoever cloth betwixt the holes with the ceramic tile jigsaw chip.
Required Tools for this how to change shower fixtures project
Accept the necessary tools for this DIY shower faucet replacement projection lined upwardly earlier you start—you'll relieve fourth dimension and frustration.
You'll also need soldering supplies (solder, flux and emery cloth) and a rotary tool tile-cut bit, a ceramic tile jigsaw blade and/or a ceramic tile drill flake.
Required Materials for this how to modify shower fixtures project
Avoid last-minute shopping trips past having all your materials ready alee of time. Hither's a list.
Originally Published: December 03, 2018
Source: https://www.familyhandyman.com/project/shower-faucet-installation/
Posted by: hernandezdencen.blogspot.com
0 Response to "How To Change Mobile Home Tub And Shower Faucet To Standard Faucet"
Post a Comment